There’s a new store in town that’s easily becoming a favourite. Australian wholesome food brand – Scoop – just landed on our shores and their latest outlet happens to be near enough for me to hop down easily. So last week after work I took a short outing and got several things there, including paella rice. The next day, I made prawn paella.
I adapted from a recipe I got from here so if you want the original, click below:
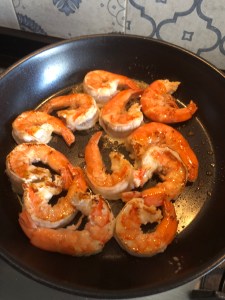
For me, the first thing which I did was to marinade huge prawns that I got from the supermarket with sea salt and garlic powder. Then using good butter, I fried the prawns till done. The result was very good because the aroma from the butter will seep into the prawns. Delicious sweet buttery garlicky prawns! Set aside after frying them.
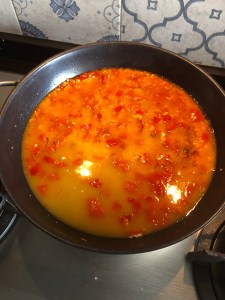
For the rice, I followed the recipe in the site but omitted the onions. I used 2 cups of rice and 500ml of organic vegetable stock. The rice, however, you need to keep a good look out for it. If the water dries out faster than the rice is cooked, then add more water. Season with salt when you add more water.
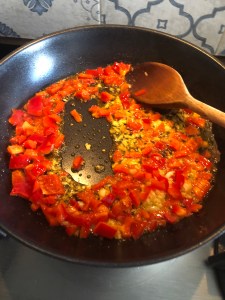
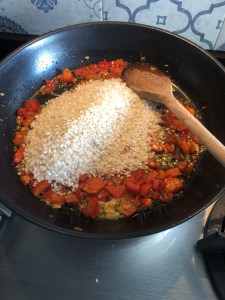
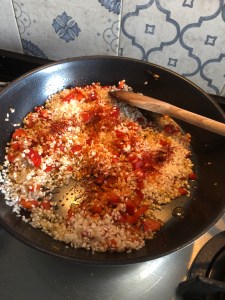
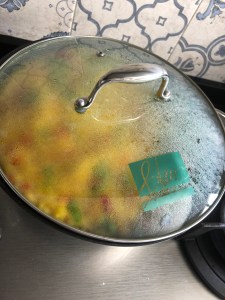
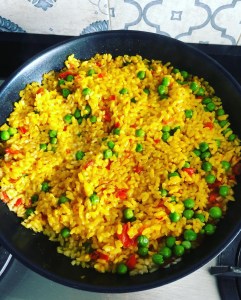
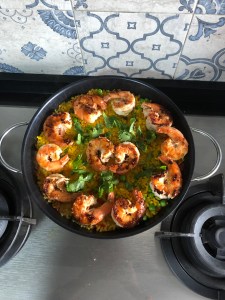
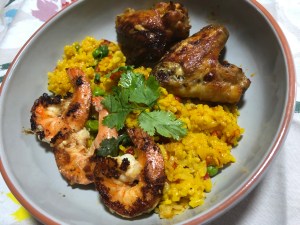
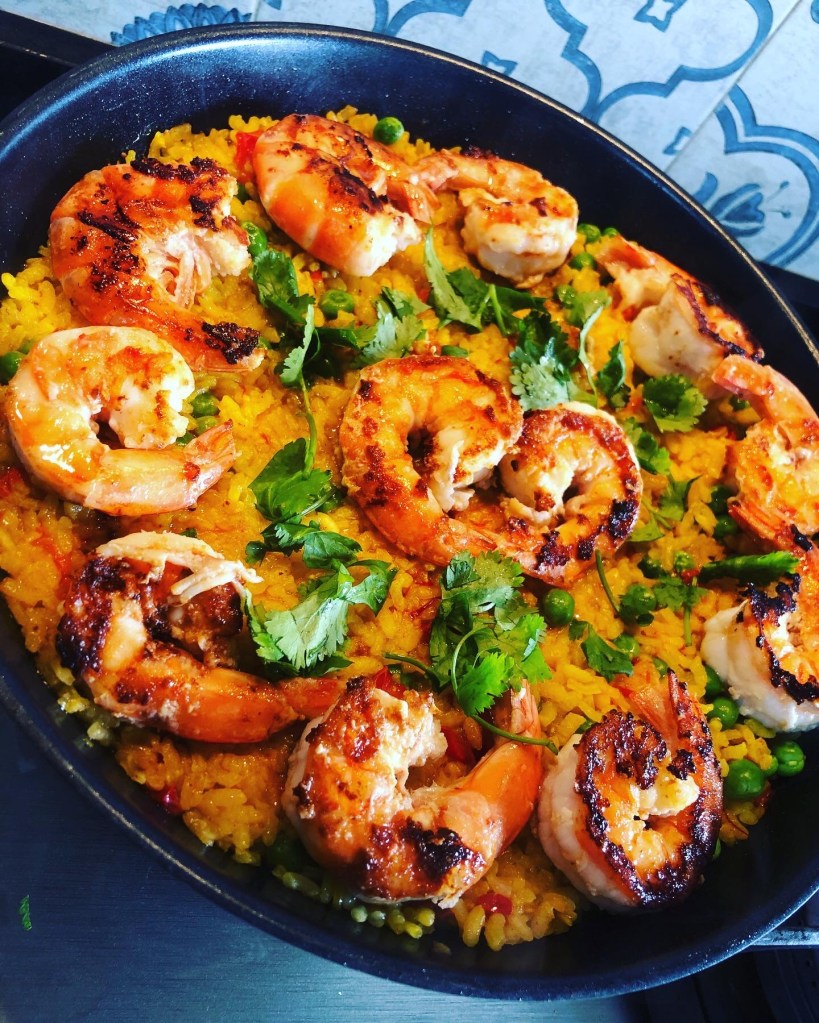
Sauté garlic and capsicum. I omitted onions but please add them. Add the paella rice. Add a big pinch of saffron threads and one teaspoon of smoked paprika. Add salt and two teaspoons of salt. Lower heat and simmer till rice is done. When rice is almost done, add frozen peas and cover. Make sure to taste the rice for doneness. Arrange cooked prawns on bed of rice and sprinkle coriander/cilantro leaves. I served with a side of baked chicken wings.
And there you have it! The recipe works but you’ve also got to use your common sense and adapt as you cook. One thing the website did not state is that you’ve got to have that crispy bottom rice which you have to get by turning up the heat after it’s done and ensuring the bottom of the rice is crispy and toasty, not burnt. I just regularly checked the bottom and patted the mixture down as I’m heating it up. The toasty bottom bit makes it all worthwhile! End off with a round of freshly squeezed lemon juice. Delicioso!
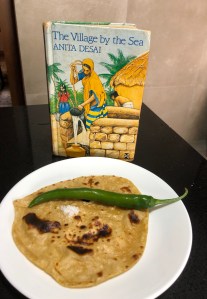
So finally I’ve decided to make chapati. With a mixer with the dough hook attached, this is a painless exercise.
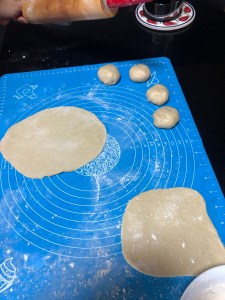
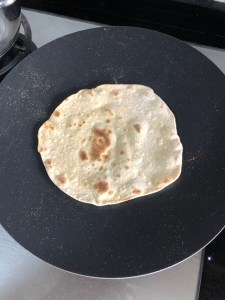
The tricky part now is getting that ball of dough to a flattened round shape. Which of course I couldn’t, but the Helper did a much better job than me.
The recipe I followed couldn’t work because of the humidity level here. It’s like almost 98 percent humidity all the time. So I’ll give the original, and what it should be if you love in the tropics.
Original: 2 cups whole meal or atta flour, 3/4 cup warm water, 1/2 tsp salt, 1 tbsp vegetable oil
My recipe that worked: 2 and 1/4 cup atta flour, 3/4 cup water, 3/4 tsp salt and 1 tbsp olive oil
Add all the ingredients in the mixing bowl, dry ones first. And then slowly incorporate water till a soft dough is formed. Line a bowl with olive oil and coat the dough with it. Leave to rest. I read that the longer it is allowed to rest, the softer the dough will be.
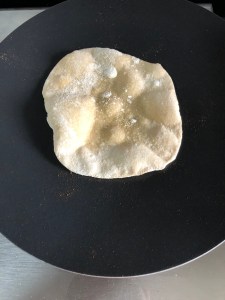
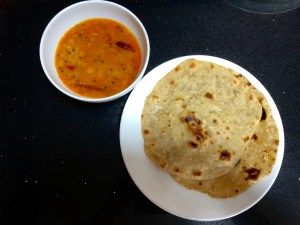
Even though I bought this wonderful mat from Amazon, I couldn’t keep to the round shape. 🤭Place on a hot griddle without any oil or fat. I even bought this flat Indian chapati griddle a few months back before the lockdown. The dough will puff up. And when it does, flip over. There’ll be pockets of coloured areas which is exactly how it’s supposed to be.Serve with dhal.
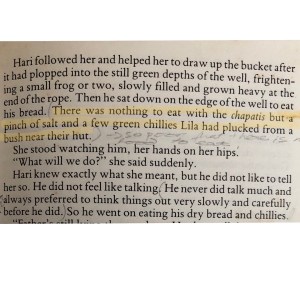
And here, I have to special mention a wonderful literary text titled The Village by the Sea. It’s been a literature text for secondary schools here for decades and it also happens to be the text that I did as a student decades ago. As a tribute, I will post these:
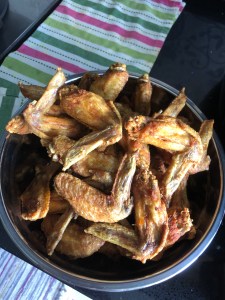
I posted this about ten years ago but without accompanying steps. This is my childhood favourite! And I’m going to make this the kids’ favourite too. It’s a dry chicken dish which is oh so fragrant! The only problem is I think my family is the only one who cooks this – as in my extended family. I scoured the net and save for one person who has the same name dish, it wasn’t exactly the same. So here goes!
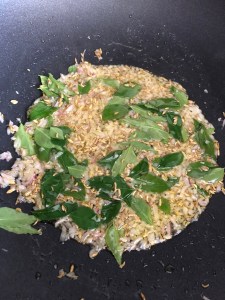
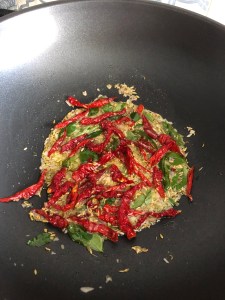
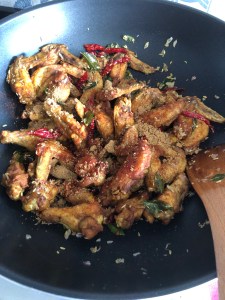
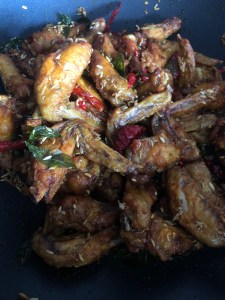
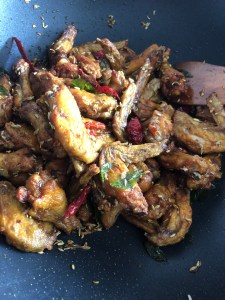
Step 1: Deep fry wings that have been marinated in turmeric and salt. And yes, we love the wingtip here in Asia. I can never understand when overseas food programmes remove the tip. That’s like the best part! Crunchy! Step 2: In a wok, gently fry finely diced onions, curry leaves and about two heaped teaspoons of fennel. If you have cumin seeds do half and half but I ran out of cumin seeds. Fry till onions are translucent and the whole oil mixture smells fragrant. Step 3: Add cut dried chillies based on preference. Step 4: Add the fried wings. Sprinkle some powdered chilli. I used smoked paprika here. Add a tablespoon or two (depends on how much wings you have in there) of brown sugar. Mix well. Make sure to stir very well so that all the oily spice mixture is coated to the wings. Best eaten fresh and hot with rice or just on its own. We love to this so much, we always make a big batch so we could have it over and over throughout the day as a snack! Ayam Bul-Bul
The Girl asked for Arabic rice today. I usually make mandhi rice or some form of Arabic rice other than the National Saudi dish- kabsa. Why? Because nobody has taught me how!
But today, I took out a recipe from this amazing book called Feast and followed to the T her kabsa recipe. This recipe called for meat, but I used chicken instead.
Here’s the recipe from the book:
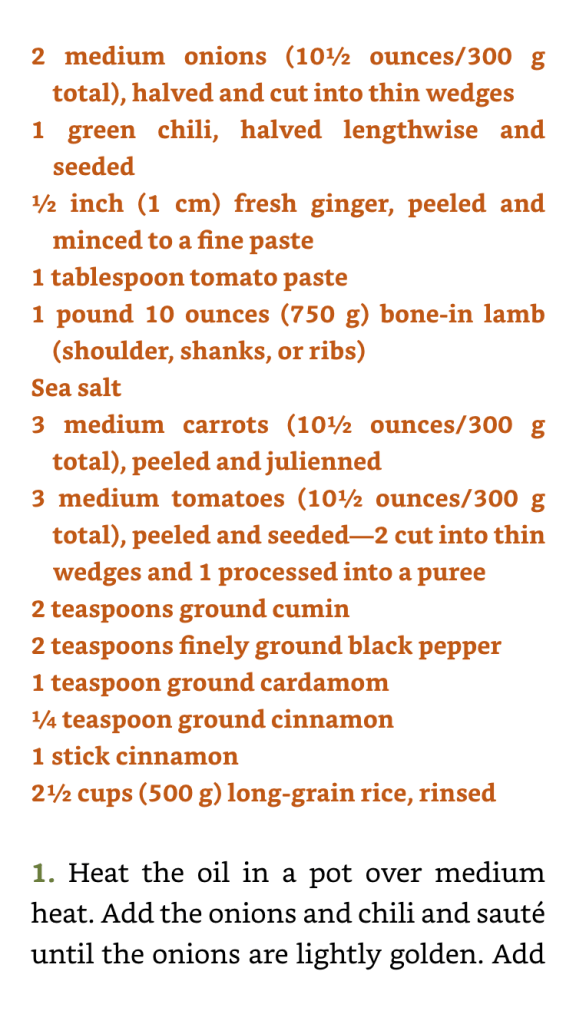
I’ve decided to use the pressure cooker instead. First, sautée the green chilli and onions. Fry until onions are soft. Then add tomato paste and ginger garlic paste. Stir well and then add the chicken to brown. Once browned, add the tomatoes, spices and water. Then pressure cook till done.
Remove chicken and set aside. Grill the chicken in the air fryer or oven when ready to serve.
Add the soaked basmati rice, grated carrots and salt to season. Cook till done.
To serve, fry some sultanas and almonds and sprinkle over rice and chicken. And it’s done! A simple simple dish to make but very flavourful!
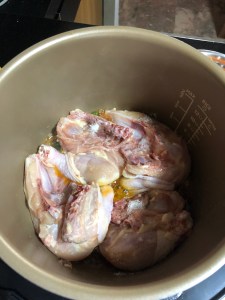
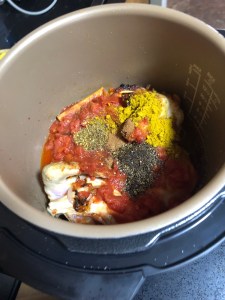
Firstly, soften onions and the sole split green chilli till onions are soft. Add ginger garlic paste and a tablespoon of tomato paste. Stir well. Then add chicken which has been cleaned and quartered skin side down fill nicely browned.When the chicken is browned, turn over the chicken pieces and add in the spices and tomatoes.
I used a pressure cooker next but you can just add some water and salt, leave it to cook. Remove chicken once they are tender.
Cover with foil and set aside till ready to serve. Just about serving time, grill chicken in an air fryer or a hot oven till they nicely grilled.
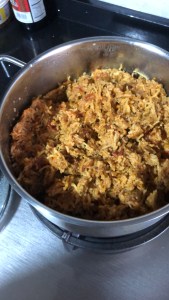
Add carrots and rice and cook. Now, this is where I failed badly. Because I used a pressure cooker, I couldn’t gauge the liquid amount. And so the rice was a disaster. It was too soft and mushy. So I made another batch of rice, cooking it in the rice cooker instead. I followed the same steps but omitted the carrots this time round because I had used up all the carrots I had for the failed attempt. The rice cooker is always the best choice! I will never cook rice in a pressure cooker again. What a waste of food and effort!
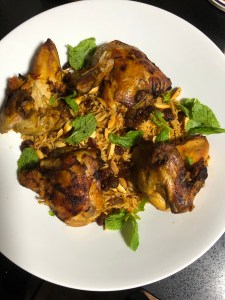
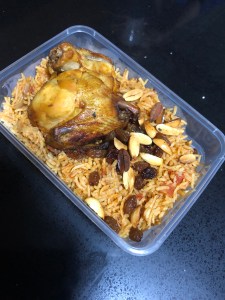
This was the second batch of rice from the rice cooker. I transferred it to a steamer to steam and keep warm. To serve, grill the chicken in the air fryer. It gives that smoky flavour. Place rice in a serving platter. Put the chicken on top of the bed of rice. Sprinkle almonds and raisins that have been fried in a bit of oil and butter till golden. Delicious!And if there’s some leftover, pack a box for your loved ones. In this case, for my Mama who’s living all by herself, alone. 😌
I must say that this recipe is for keeps. I ground the cardamom myself. As well as the black pepper. I think making your own spices do make a difference to the overall fragrance of the dish. Try this Saudi National dish and your lockdown days will be a tad cheerier. Ma’assalama 👋🏽
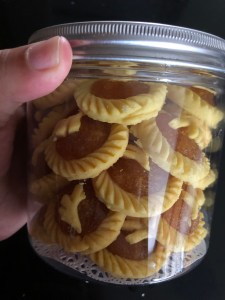
Every Chinese New Year or Hari Raya (Eid ul Fitr) will never be complete without families making and eating these delicious buttery sweet and sour pineapple tarts. And being in a beautiful multi-racial country, I get to enjoy everyone’s festivities many times over. ☺️
Earlier in the year before COVID-19 interrupted our lives, I already received a bottle of pineapple tarts from the office management for Chinese New Year. Now, with the Circuit Breaker in place and Hari Raya round the corner, I decided to finally conquer my fears and make my mother’s pineapple tart recipe.
It’s a daunting task. You definitely need helpers at hand. However, you can halve the recipe or even quarter it and make a small batch. Here is the original recipe:
For the tart pastry:
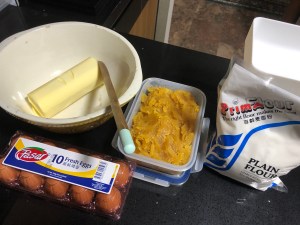
1. 500g butter (use the best you have. I used French butter and I think that made all the difference)
2. 3 whole eggs (some people use 2 yolks and 1egg but that will result in a delicious but crumbly pastry. Delicious I know but difficult to handle)
3. 900g plain all-purpose flour
4. 1/4 tsp of yellow colouring. You can omit this.
For the pineapple filling: I cheated. I used a store bought ready made filling but added one pineapple of my own. To make your filling from scratch, you need to grate 2-3 fresh pineapples, and then cook it down on a Low flame till it becomes jelly like. Add sugar. You’ll know when it’s ready when all the liquid has evaporated and you can form balls from the pineapple.
And then the rest is easy. Laborious work but easy.
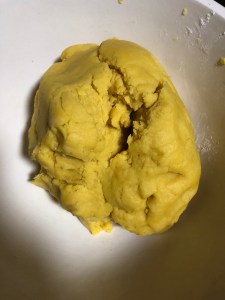
First step is to make the dough. Using a mixer is easiest but you can certainly make this using just a wooden spoon, and a lot of muscle power.
Prep your ingredients. The butter needs to be very soft so that you can cream it with the eggs.Cream butter and eggs. Add flour slowly till you can form a soft dough. Break the dough into four for easier handling and let it rest, covered, for at least two hours.
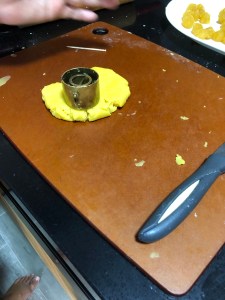
Once the dough is rested, it’ll be easy to roll. If you can’t roll it, just use your cleaned palms and pat down as much as you can’t and then, using a tart cookie mould, cut the shape.
This is my tart cutter. You can find other types. All you need is a cutter with an indentation hole in the centre for you to place your filling in.Press hard and clean the edges. This cutter is not so good that’s why it’s hard to achieve a clean line. The more modern plastic ones will produce better results. With your thumb, gently peel off the dough. Tada!Fill a tray of the dough first.These pineapple jelly balls are too big but they will make an easier task later. From that pan of jelly, take a small scoop to form into balls. Then eyeball how much you need to fill the dough casing. Once the pineapple jelly is in the dough, you can choose to do a topper with some dough. Roll out some dough till very thin and cut into shapes. Diamonds, flowers, or you can just omit this step. Put a ready filled tray in the oven at 170 Celsius for 10- 15min or until the bottom is done. Don’t over bake or you’ll end up with a hard filling and pastry. The first tart here, you can see where the edges of the pastry was not neatly cut. But many turned out OK so I was pleased. Persevere and carry on. 500g of butter will make about 180-200 of this size tarts. That’s a lot! So if you’re just making for yourself, half the recipe. But I like to give away some to close family and friends so that everyone can enjoy this decadent treat! 😍